
Showing posts with label delightfulbydesign. Show all posts
Showing posts with label delightfulbydesign. Show all posts
Monday, January 16, 2012
Thursday, November 24, 2011

Sunday, October 23, 2011

Thursday, October 20, 2011


Sunday, October 16, 2011
Etsy Treasury "Moonstone"
I wanted to do a treasury of beautiful pieces featuring this beautiful and fascinating stone. Enjoy!


Friday, October 14, 2011
Copper and Sterling Silver Leaf Earrings
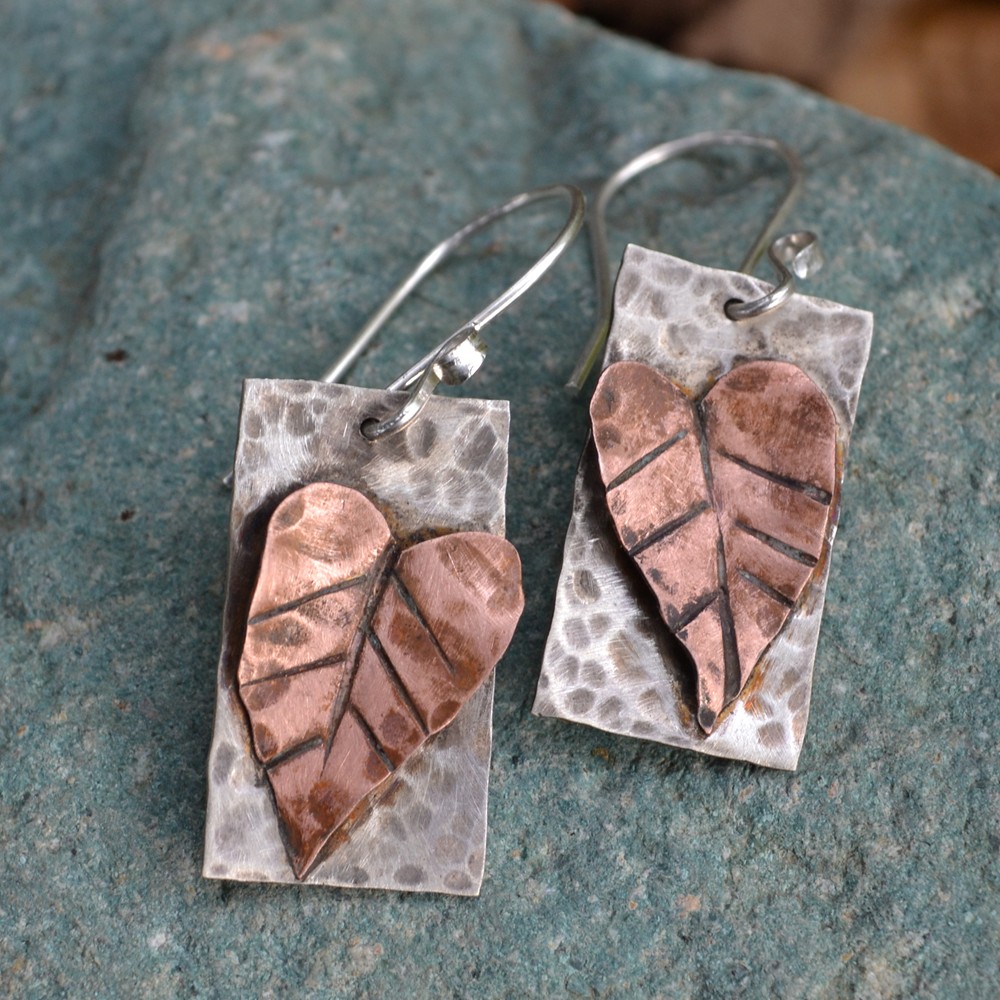
Pure copper leaves attached to a rectangle shaped sterling silver sheet that has been hammered. The leaves have a three dimensional quality to them. The sterling silver has been hammered and a patina applied to make it look like a stone. The fall season can be so pretty when the leaves first start to change and fall covering the stones beside a creek in a thin layer. The earrings are finished off with a hand made sterling silver earwire.
The earrings hang at almost 1 3/4" and are a touch over 1/2" wide.
Thursday, October 13, 2011

Sunday, October 2, 2011

Tuesday, September 27, 2011
New Copper and Sterling Silver Earrings on Etsy

Go places wearing these hammered copper and sterling silver crescent shaped drops. These are a great earring for any occasion. Made from pure copper sheet and sterling silver you get the great look of warm copper and cool sterling silver. The earrings have been shaped with a slight dome to give it dimension. I then applied a patina to further bring out the details. The earrings have been polished to have a good shine to them. The whole earring was finished off with a hand formed sterling silver earwire.
The earrings hang at just under 2 1/4" and are just under an inch at their widest point.
The earrings hang at just under 2 1/4" and are just under an inch at their widest point.
Saturday, July 16, 2011
Sterling Silver Turquoise and Garnet Pendant
Robin's most recent addition to her etsy shop, an amazing sterling silver pendant with turquoise and garnet.

This is a one of a kind sterling silver, turquoise, and garnet free form pendant. Each stone is set in a fine silver bezel. The turquoise stone is dramatic by itself, paired with the garnet it is very striking. To further bring out the colors I patinaed the inside of the piece while the outside frame is highly polished bright silver. The whole piece is finished off with an 18" sterling silver box chain. I showed a picture of the back of the piece so that you could see the bail was designed to accomidate many different types of chains.
The pendent itself is about 2" long and is about 1 1/4" wide and the widest point.
Jim

The pendent itself is about 2" long and is about 1 1/4" wide and the widest point.
Jim
Saturday, July 9, 2011
New Etsy Treasury "Copper and Sterling Silver Together"
Robin has been busy creating some new pieces and an Etsy treasury.

Robin's lastest works.

http://www.etsy.com/listing/77410119/sterling-silver-hoops-with-amethyst-and
 http://www.etsy.com/listing/77471141/copper-swirl-ring?ref=v1_other_1
Jim

Robin's lastest works.

http://www.etsy.com/listing/77410119/sterling-silver-hoops-with-amethyst-and

Jim
Thursday, June 30, 2011
Etsy Treasury
Robin created a treasury today "Inspired by Nature".

http://www.etsy.com/treasury/MTEyODcyMTR8Mzk3NzkyMTk5/inspired-by-nature?ref=pr_treasury

http://www.etsy.com/treasury/MTEyODcyMTR8Mzk3NzkyMTk5/inspired-by-nature?ref=pr_treasury
Sunday, June 19, 2011
Red Creek Jasper Etsy Treasury
I created a treasury for "Red Creek Jasper" on Etsy.

http://www.etsy.com/treasury/MTExMDU3NTF8MzUxNjgwMTEx/the-wonderful-variety-of-red-creek
Jim S.

http://www.etsy.com/treasury/MTExMDU3NTF8MzUxNjgwMTEx/the-wonderful-variety-of-red-creek
Jim S.
Wednesday, June 15, 2011
Sunday, June 12, 2011
Sterling Silver Larimar earrings
I found some cute little Larimar stones on etsy, but they were cut as a square. I was a little aprehensive about purchasing these because I had never set a square cabachon. After looking at them for several days I decided to go for it.
After a little trial and error, here are some of the things that I found helpful when setting a square cabachon. The first was to put the seam in one of the corners. This helps to have a cleaner line, and is just a whole lot easier to set. The second thing I discovered is that you need to file down the bezel at each corner of the stone. To do this I dry fitted the stone and then marked each corner with a sharpie line. Then filed to the marked lines. I would recommend doing a second dry fit before a final setting.
These earrings are available in my etsy shop.
 |
| Finished Earrings |
These earrings are available in my etsy shop.
Thanks for visiting..........Robin
Monday, May 9, 2011
Flower Pendant
Robin finished a delightful flower pendant of sterling silver with a amathyst stone.
 Robin also designed and hand made some sterling silver earrings with bezel set lapis and a copper swirled line soldered on the side. The contrast and play of complimentary colors make the blue really stand out.
 She is currently working on a red jasper piece and a larimar piece.
I was able to finish several earrings and have a couple very close to completion. I am excited about a organic shaped piece of formed copper with forged brass intertwined.
Jim


I was able to finish several earrings and have a couple very close to completion. I am excited about a organic shaped piece of formed copper with forged brass intertwined.
Jim
Wednesday, May 4, 2011
How To Make Head Pin Or Rivet Head Making Tool
This is how I made a simple tool to make flat head pins. The same concept could be used to make a rivet head making tool.
Video of making head pins coming soon.
Jim
 |
| Use a harded steel washer and drill a hole just bigger in diameter than the wire you plan on using for the head pin or rivet. Use some cutting fluid or WD40 while drilling the steel to keep the drill cool and lubricated and be patient, as the steel is much harder than precious or base metals used in jewelry. You can find washers at your local hardware store or online through places like McMaster-Carr. |
 |
| Drill a larger hole (1/8") for 22ga wire in a short piece of wood near one end. |
 |
| I used 5 minute epoxy to hold the washer to the piece of wood. |
 |
| Mix epoxy 1:1 according to instructions and put over the hole where the washer will go. |
 |
| Place the washer over the hole lining up the small hole drilled through the washer and the clearance hole in the wood. |
 |
| Clamp the washer in place and allow full cure time to dry, typically 24 hours. I put a piece of scrap paper between the washer and clamp to keep the epoxy off the clamp. |
 |
| Remove the clamp and paper. Sand the top of the rivet to remove excess epoxy and create flat surface. Using the same drill sizes used in the washer and clearance holes, chase out the epoxy by redrilling. |
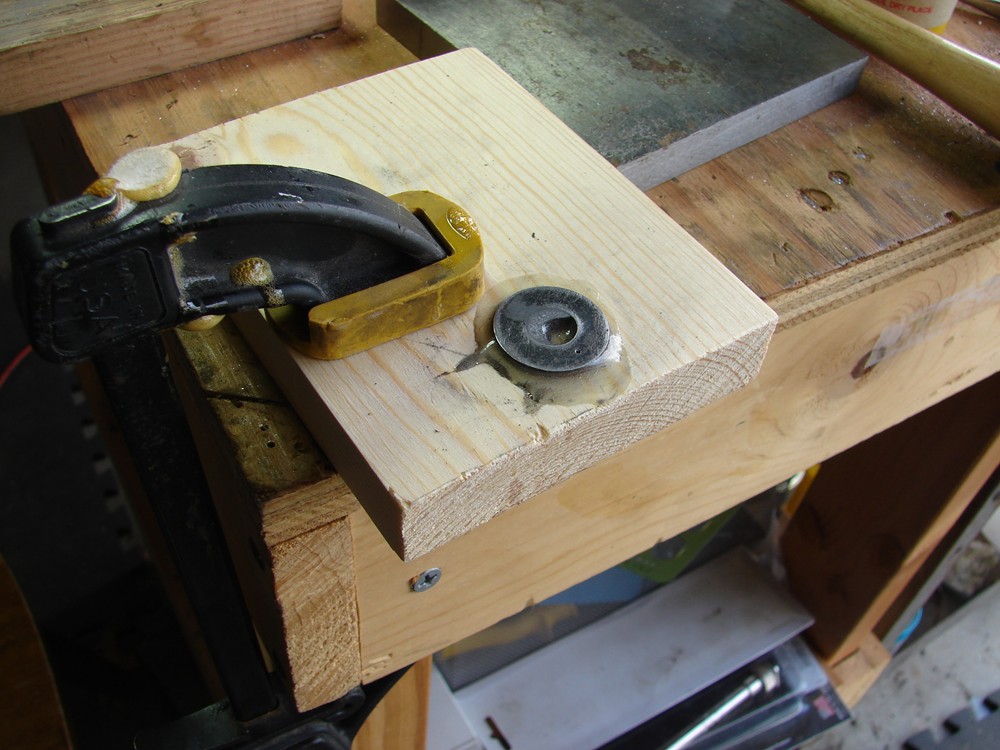 |
| Clamp the block to a table with the rivet hole just past the tables edge. The tool is finished and ready to make head pins or rivets heads. |
Jim
Tuesday, May 3, 2011
Sterling Silver and Blue Swarovski Crystals
Robin's latest earrings.

Handmade sterling silver hoop earrings with sterling silver chain, blue swarovski crystals, and sterling silver bead dangles. These earrings are a perfect for everyday, or a night on the town. They are light weight and comfortable to wear while still giving you great movement. The earwires are handmade by me out of sterling silver wire. The earrings hang at a total lenght of about 1 3/8" and are about 1/2" wide at the widest point.
Friday, April 22, 2011
How To Make Aluminum And Resin Autism Awareness Pendant Steps Part 1 of 4
This is a step by step on how I made an Autism Awareness Pendant, using aluminum, copper rivets, paper, colored pencils, and clear resin.
 |
I sketched the design, made a scan and scaled it to the correct size and printed a copy. |
 |
I selected aluminum (.06 x 1.5 x 2.1" as my base material for this project. It is easy to work, very white in color, and light weight. Any thicker gage metal will work. |
 |
I used a glue stick to attach the sketch to the aluminum. I then sawed the outer oval out complete and recycled the outer pieces as scrap. |
 |
I then selected a lighter gage aluminum sheet as the back. |
 |
I traced the cut out oval onto the thinner sheet with a sharpie. The back will be slightly larger which helps with fitup and will be trimmed later. |
 |
I then cut out the back. |
 |
I then drilled a hole in the center section so I can insert saw blade and cut out the inside shape. |
 |
The pendant set up in bench pin ready to be sawn out. |
 |
The pendant with center sawn out. If dealing with precious metals drill a smaller hole on the outline so the center piece can be used in another piece. |
 |
File the inside to nice finish to remove the saw marks. Remove the paper pattern with some water. |
 |
I put the pendant on a target grid to aid in laying out the rivet holes in the open areas around the perimeter. |
 |
I used a compass to add the hole locations from the edge. |
 |
I used a center punch at the intersections of lines for each rivet. |
 |
| Select drill that matches size of tubing used for rivets. I am using copper, but other malliable metals would work. Note only the top rivet needs to be a tube rivet, the others could be solid for more design possibilities. |
To be continued.....
 |
Drill all rivet holes at centermarks. |
Thursday, April 21, 2011
Work Featured In Etsy Treasuries
Robin has piece featured in two treasures for Autism Awarenss.

http://www.etsy.com/treasury/4dadfea5f7118eeff6064530/puzzle-pieces
http://www.etsy.com/treasury/4daf979c531f8eefd3c69fda/autism-awareness-month
I am featured in a treasury as well.

http://www.etsy.com/treasury/4db06a3592738eef1ce6079a/men-remember-your-mama
Special thanks to curators of treasuries for including our work.
Jim
http://www.etsy.com/treasury/4dadfea5f7118eeff6064530/puzzle-pieces
http://www.etsy.com/treasury/4daf979c531f8eefd3c69fda/autism-awareness-month
I am featured in a treasury as well.
http://www.etsy.com/treasury/4db06a3592738eef1ce6079a/men-remember-your-mama
Special thanks to curators of treasuries for including our work.
Jim
Subscribe to:
Posts (Atom)